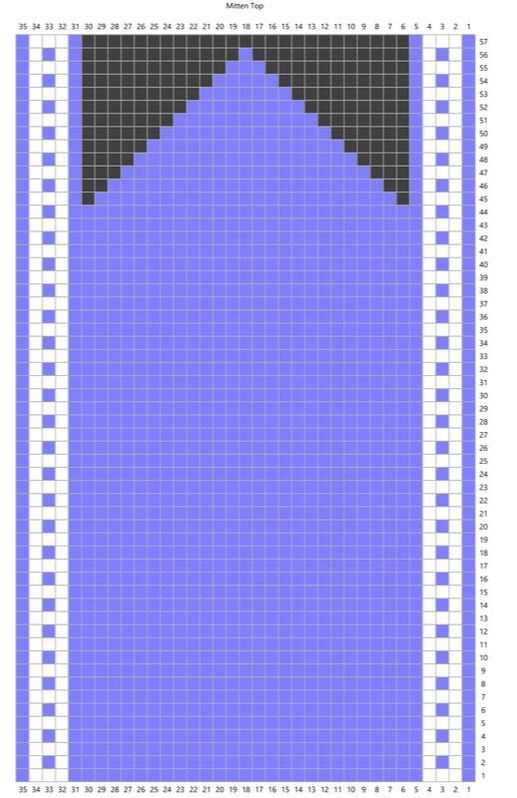
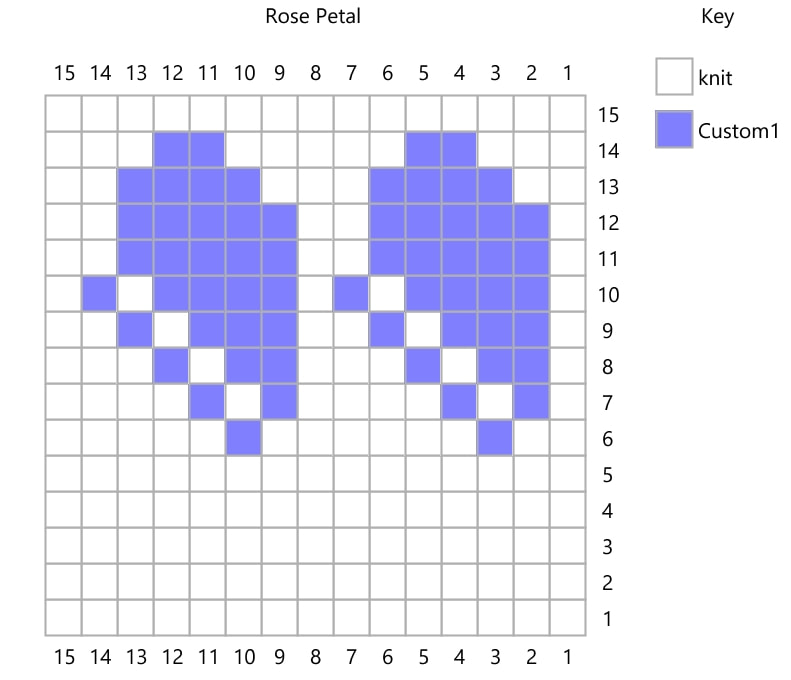
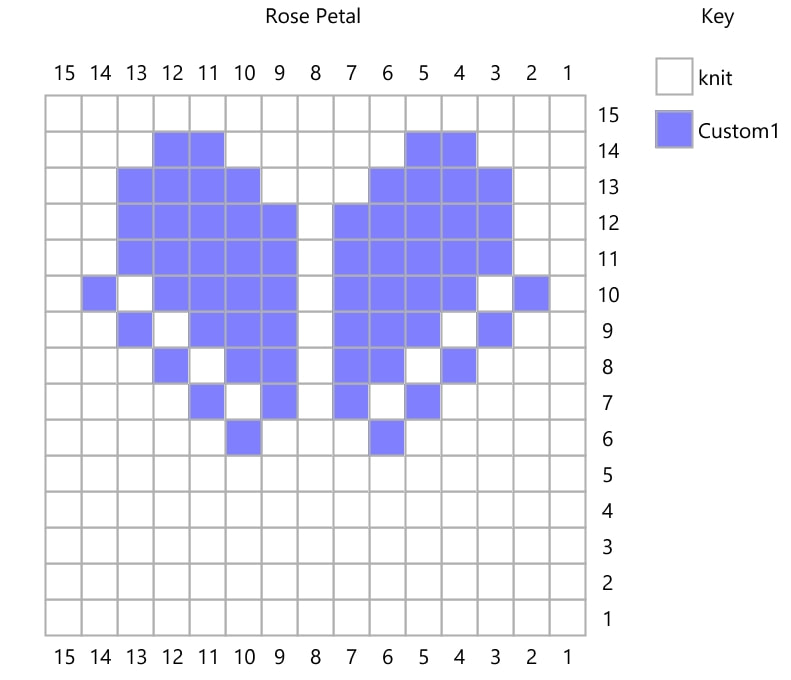
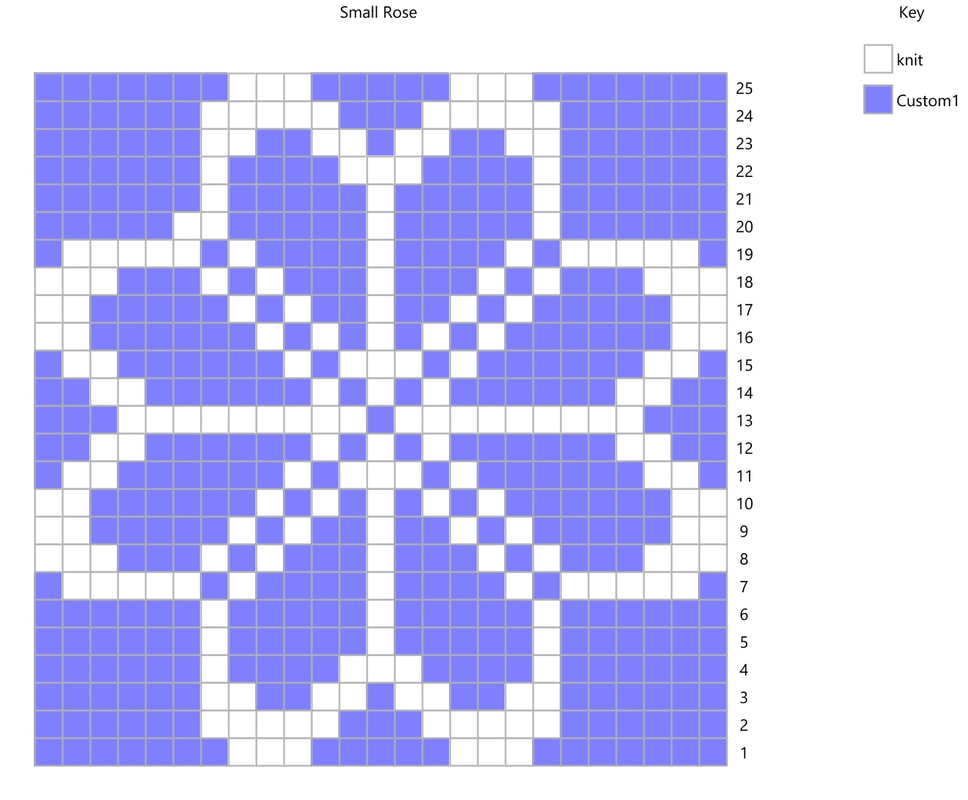
 In my last post, I shared how to modify the size of a stranded colorwork motif. In this post, I'll share how to use it in a repeat with a simple mitten design. In this pattern, the dark gray/black square represent no stitch. There are decreases in the pattern to form the mitten top which are not noted in the chart - this is to give clarity in the colors. The set of five stitches at the left and right edges of the pattern form a border at the sides of the hand. They do not change, but as the decreases shape the top of the hand, they will slope inward. 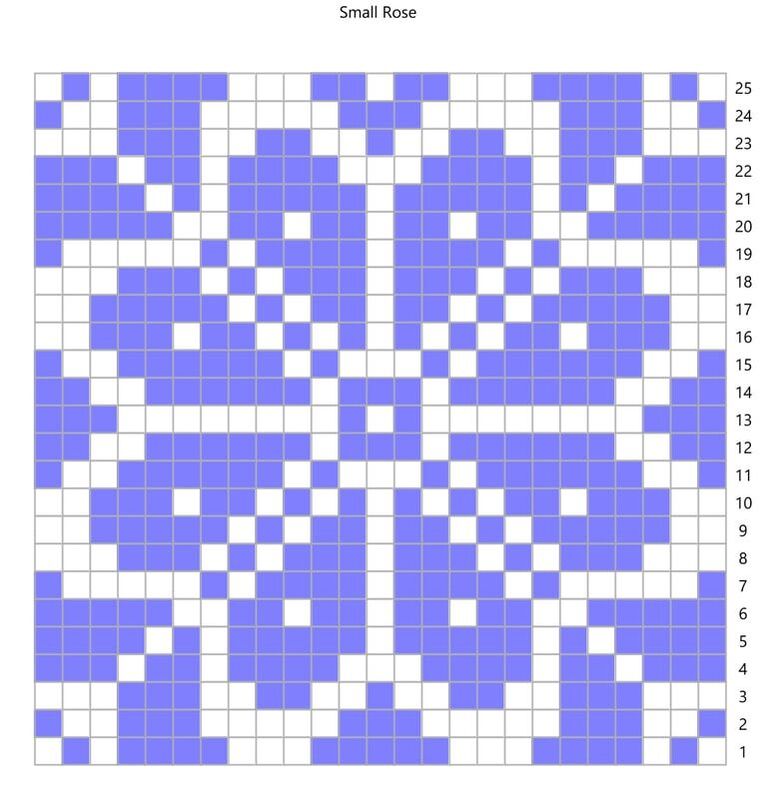 The first step in setting up a pattern repeat is to simply repeat the pattern. Here, I'm using a variation on the pattern I shared in my last post. 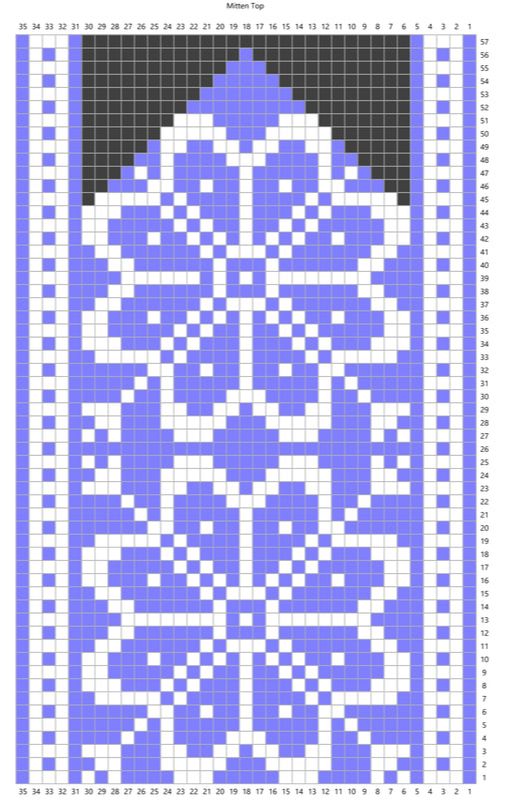 Stacking the pattern on top of itself, we get two repeats of the rose. The outer corners at the top of the rose are cut off. This is fine, as long as the rose itself fits fully into the pattern. (If it didn't we'd need to go back and adjust.) It seems like the white of the rose petals falls off the edge of the pattern. However, because the borders are edged in the background color, there will be a purple border around them. 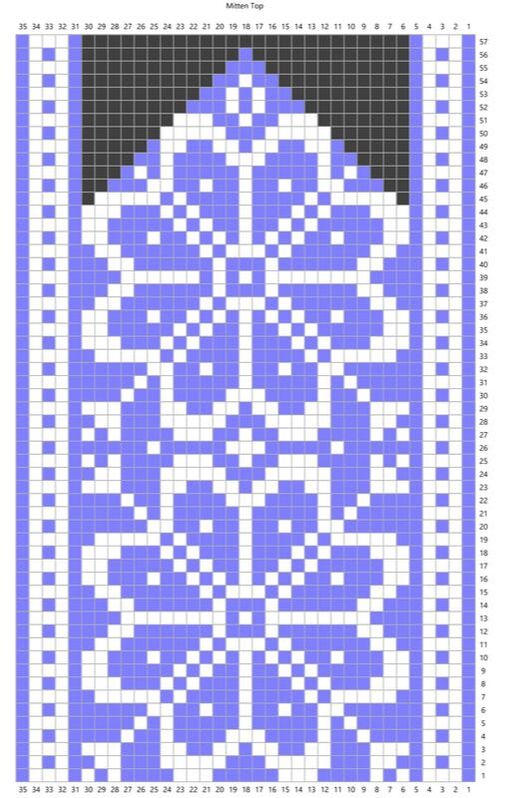 Usually, when you repeat a large motif, there are places that end up with very long floats. The next step is to create new, smaller motifs to prevent these floats. Here, I've added a small cross and two dots between the motifs to prevent long floats. At the top, there is a lozenge shape to fill in the space. Your options at this step are limited only by the number of stitches you have and your imagination. And that's really all there is to it!  Have you ever fallen in love with a stitch pattern, but it's not quite the right size? In this post, I shared how to resize a cable pattern. Today, I'll share one approach to modifying the size and design of a stranded colorwork pattern. This is a great technique to use if you're using handspun yarn that doesn't exactly match the gauge of a pattern, or if you need to substitute yarn. In this example, I'm sizing down, but it would be just as easy to make the stitch pattern larger with these same ideas.  In this example, I started with a 29-stitch-square repeat of a traditional Norwegian 8-petal rose. I liked this pattern, but needed a stitch pattern that would fit into a 25-stitch square. The easiest, and most obvious choice in my situation was to remove the border of solid color stitches, which took me down to 27 stitches. I still needed to reduce 2 stitches on each side, and chose to start with the petals. 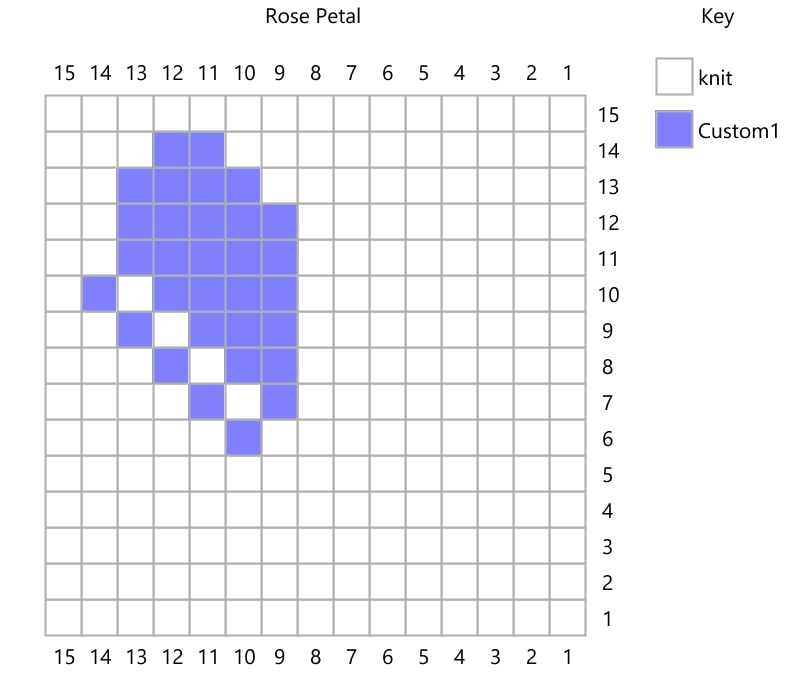 By drawing a petal that has one less row and one less column, I've reduced the size of the pattern. Expanded over the entire repeat, this will get me to the right number of rows and stitches.
At this point, it would be totally fine to draw out the rest of the pattern by hand. However, a little bit of copy/paste/rotate action saves a lot of work. This also helps to make sure that any inconsistencies get repeated (which is how patterns are made).
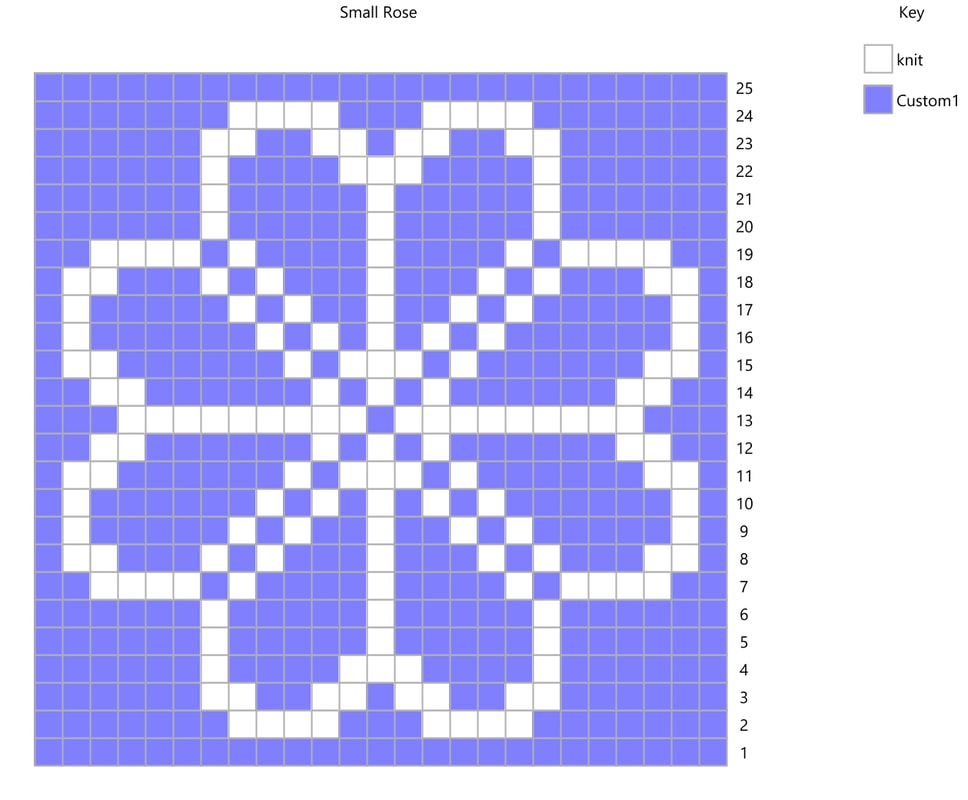
The next step is to fill in the outer petals. You'll notice that in the image on the left, the petals touch the outer edges. This isn't a problem if they touch a border that is the same color as the background. However, to make sure the pattern is clear, you can make the outer petals thinner, as in the image on the right. 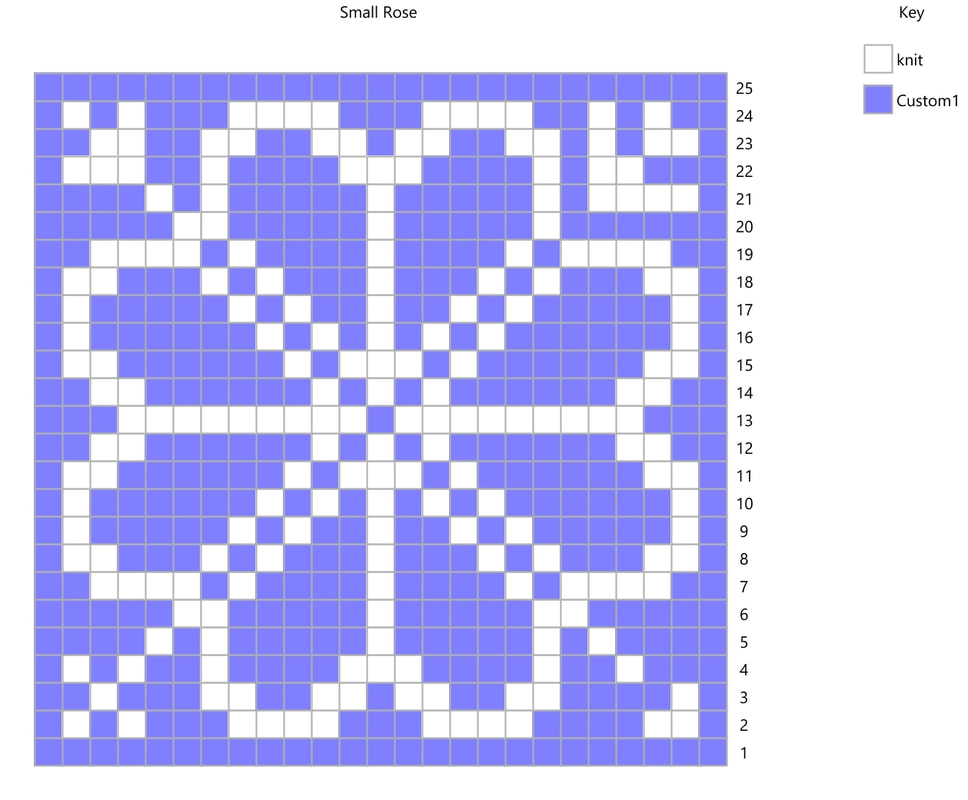 Now it's time to fill in the corner patterns. Because there are fewer stitches to work with than in the original, this pattern must also be adjusted. There are lots of options - I've placed a different pattern in each corner to show the possibilities. Normally you will choose one pattern and repeat it in each corner. At this point, the pattern is fully resized and you're free to use it in your pattern, or you can continue to play around with modifications. 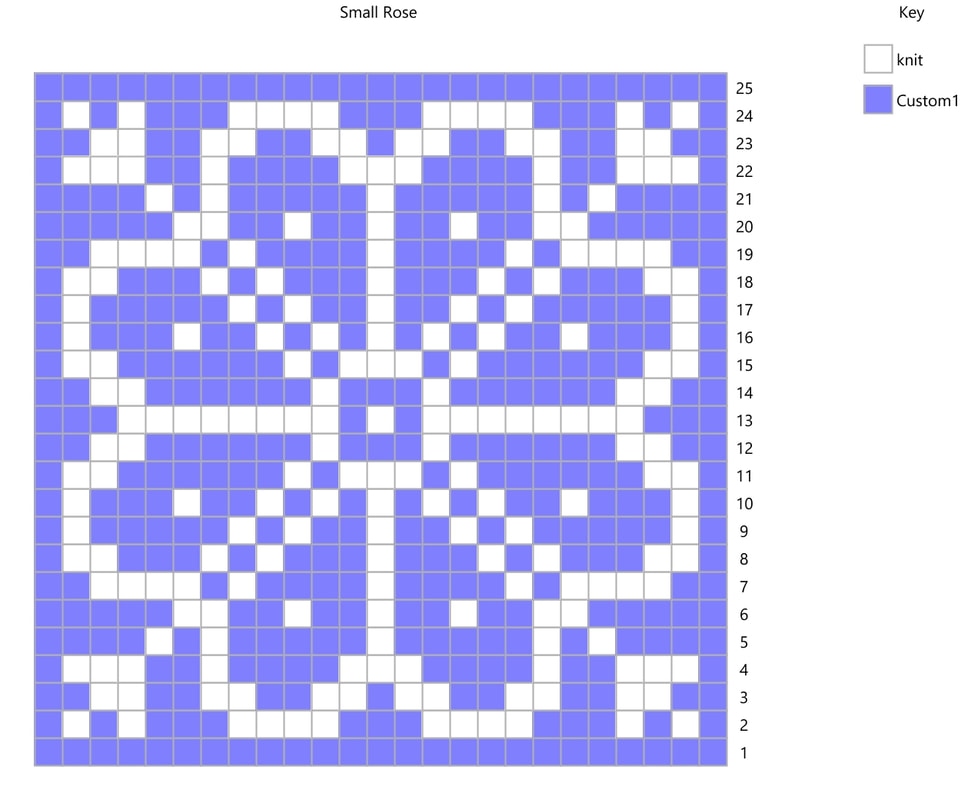 Here I've updated all the corner patterns with my favorite design, modified the center of the rose to be a little less busy, and added dots at the center of each petal. It's easy to play all day with modifying stitch patterns on graph paper or on the computer, but nothing beats a swatch! Because a knit stitch isn't exactly square, it's important to check your pattern in a swatch to make sure it will turn out the way you want it to. After that, the next step is to place your new design into the pattern you want to use, which will be the topic of the next post.  Here is the fourth episode of the Fiber Sprite Podcast! On this show, I'll talk about projects I've been working on and my visit to the Taos Wool Festival.
Knitting:
Designing:
Spinning:
Weaving:
Books: 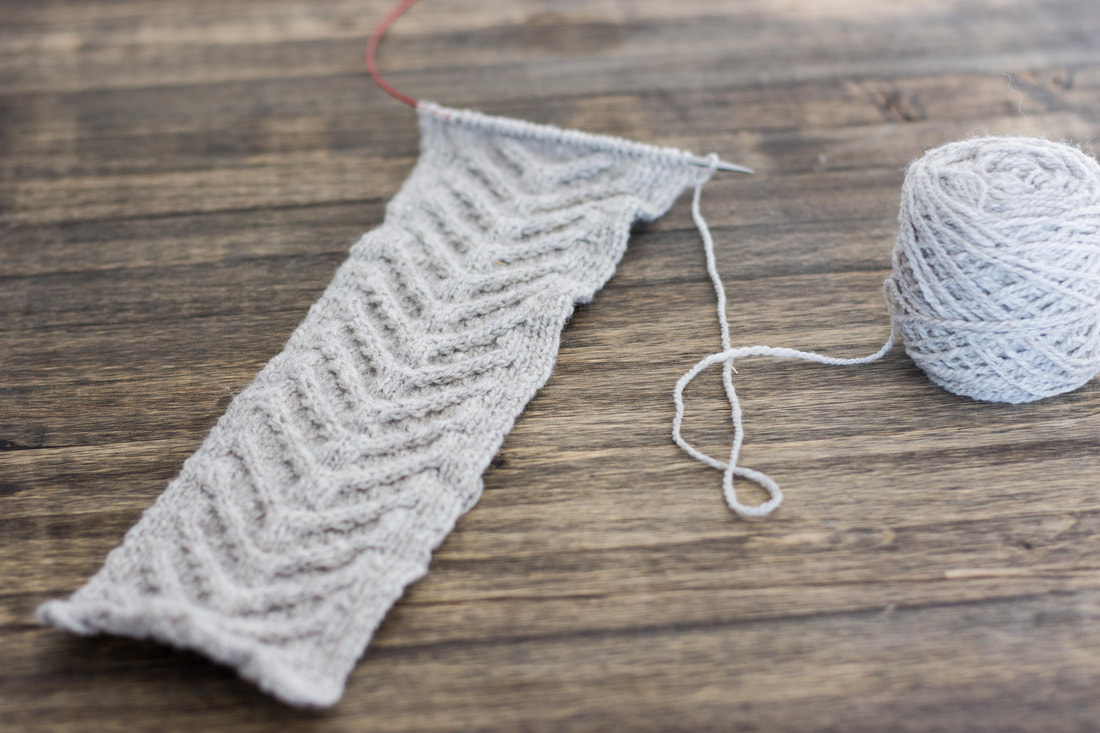 Last week on the podcast I shared that I was starting a sweater with some of the yarn I purchased at the Sneffels and Taos fiber festivals. First, I'm working a border for the sweater, and then will knit the body of the sweater and seam the border on. I started the project when I was traveling, and didn't have all my stitch dictionaries handy. Plus, stitch dictionaries are really a jumping off point - there are infinite numbers of possible stitch combinations, and stitch dictionaries can only give you a fraction of what's possible. I knew that I wanted an antler cable, so first I looked on Ravelry for other patterns that had antler cables. Since I didn't find any sweaters that were exactly what I had in mind, I decided to design my own. (More on that later!) I found a basic antler cable pattern chart from the free Antler Toque pattern by Tin Can Knits. It is a sixteen-stitch wide cable with six rows: 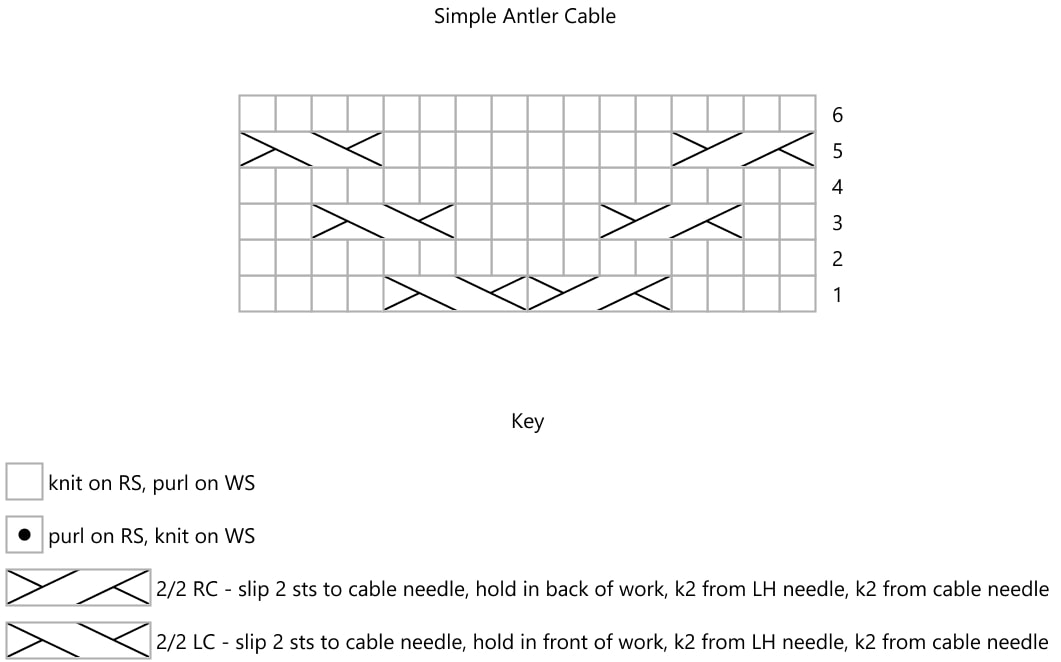 This is a pretty standard antler cable - like you might find in many stitch dictionaries. However, based on my gauge swatch, I felt like this cable would be too narrow for me. Rather than hunt for more cable patterns, I decided to modify it. First, I added two stitches to either side of the pattern, making a 20-stitch wide cable pattern. In order to continue the pattern, I also needed to add two rows. Then, I added in the cable crosses in the pattern that had already been established. 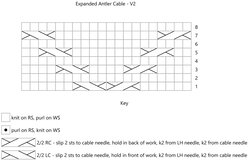 I felt like this still wasn't wide enough, so I added another two stitches on either side of the pattern, making the cable 24 stitches wide. Instead of continuing to add height, I added these cables at the bottom of the chart, so that the beginning and end of the stitch pattern nest together: 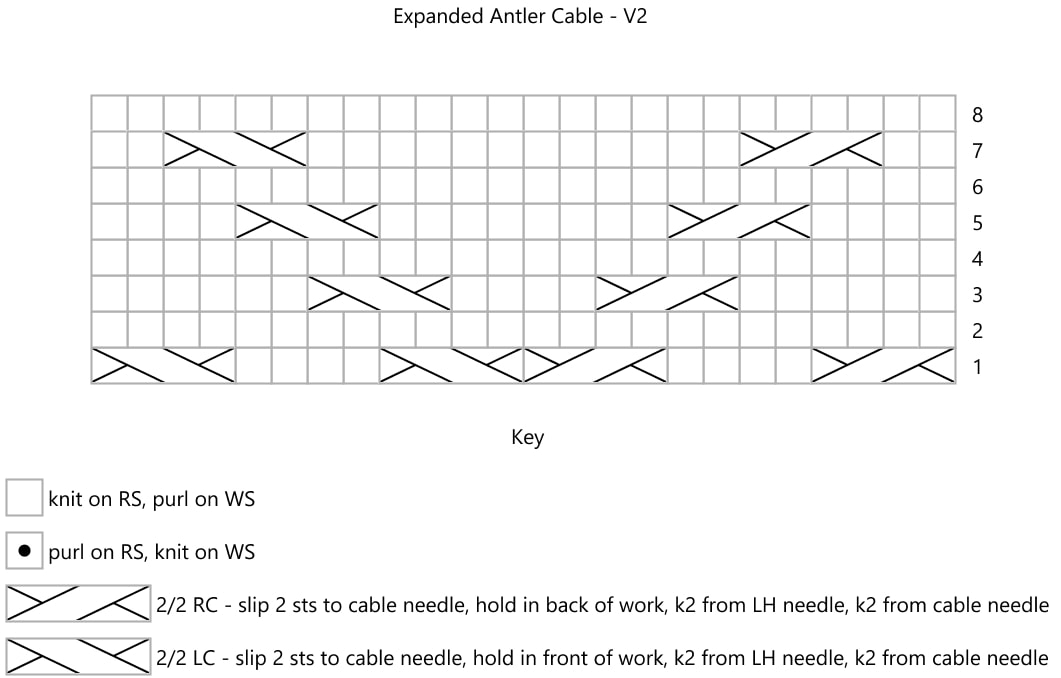 Lastly, I added a ribbed border of 5 stitches on each side, for a grand total of 34 stitches. The ribbed border sets the cable off in a subtle way, keeps the cable from curling, and will give me room to seam the band to another piece of knitting. 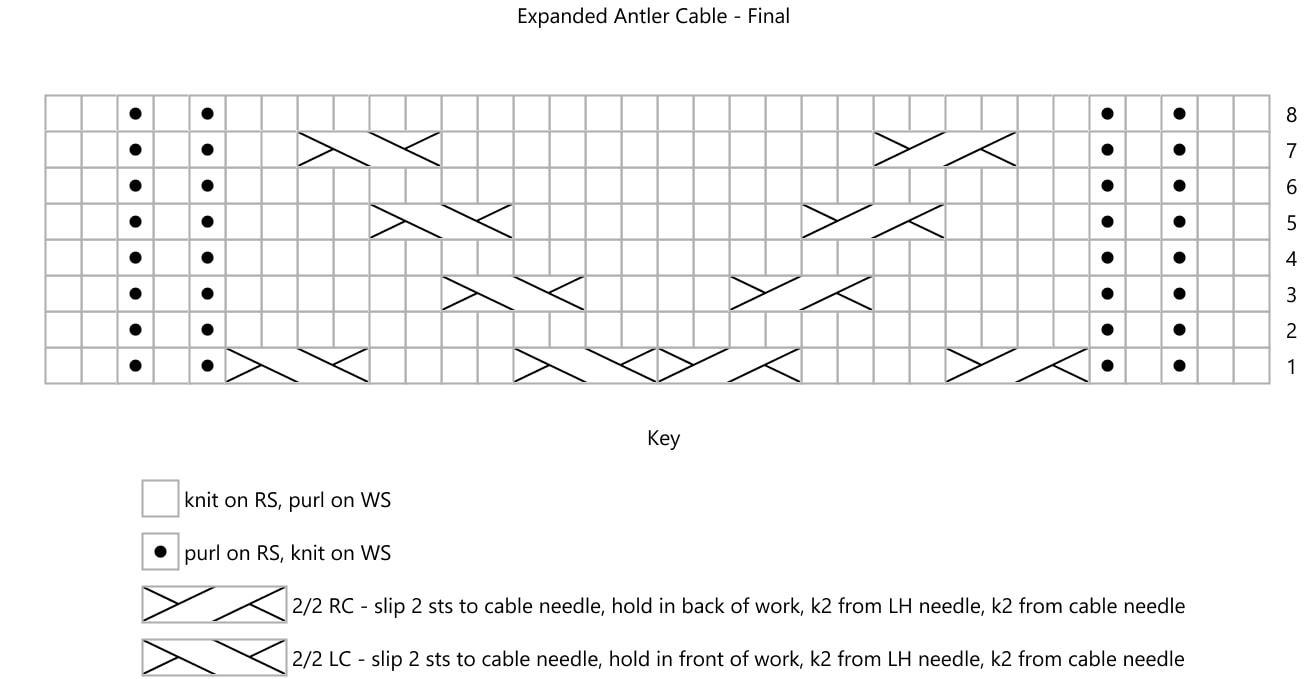 Modifying stitch patterns can be daunting at first, but it's really just a process of tweaking an existing pattern until you have something that works for you. For more information about modifying cable patterns, Norah Gaughan's Knitted Cable Sourcebook is an unbeatable resource.
Happy cabling! 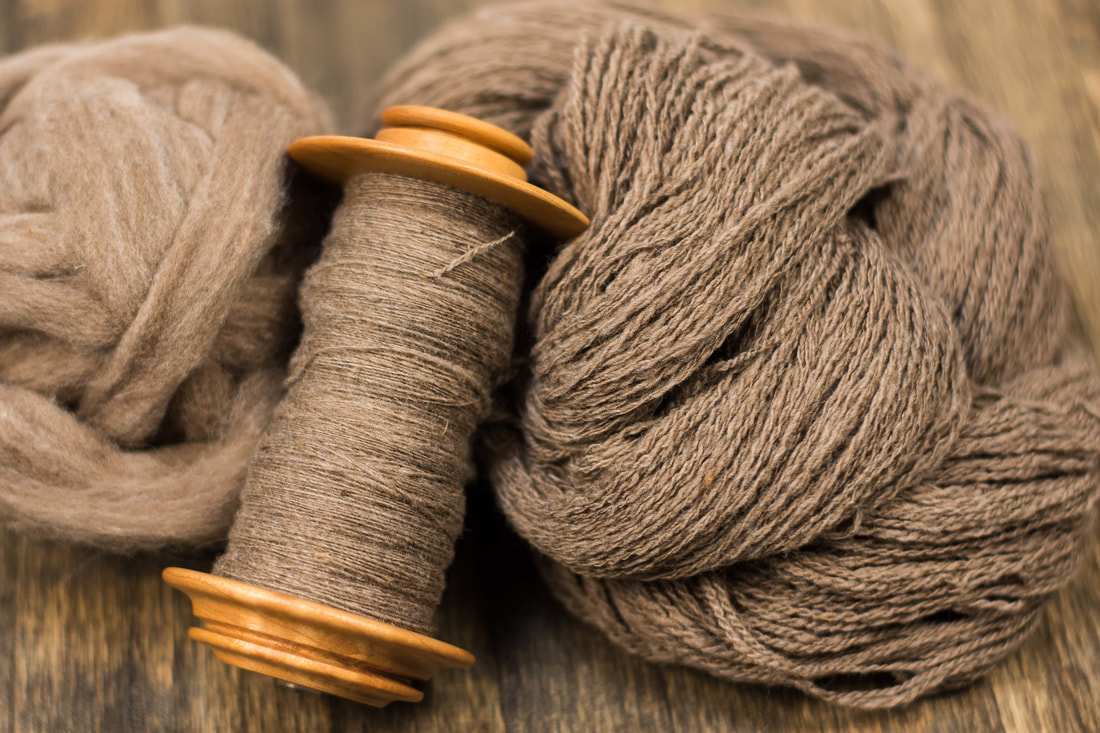 Do you know that "I have nothing to wear" feeling? Usually I feel it when there's a lot of laundry that needs folding, or when there's something I want to wear, but it's in the dirty pile. There are really more than enough clothes in my closet, but sometimes that feeling still sneaks up on me,
The same thing happens with my knitting and spinning! I have plenty of things to work on - more than enough to keep me busy for a very long time. But sometimes it seems like I have nothing to spin. What that really means is usually that I'm putting off another part of a big project. With spinning, I'm usually putting off plying because it's my least favorite step. That's exactly what happened to me a couple of weeks ago - I had plenty of plying to do, but really wanted to sit and draft yarn out bit by bit. A quick stash dive revealed some rose grey Cormo from Dresow Family Farm. I'd picked up about 12 ounces of it from them when I went to the Montana Association of Weavers and Spinners conference last summer. The Cormo breed of sheep is a cross between Corriedale and Merino, and was first bred in Tasmania in the 1960s. This fiber really is lovely - it's soft and springy like Merino, but drafts easily like Corriedale, making for a lovely spinning experience. I'd seen plenty of white Cormo before, but never a natural color, which is part of what prompted me to buy this roving last summer. The color is called "rose grey," and it's difficult to get a true representation of it in a photograph - a light gray, with a bit of a beige undertone. The fiber came to me already prepped as pin-drafted roving. There's a decent amount of vegetable matter in the roving, but the light and airy fiber prep more than makes up for any time spent picking out bits of grass. And of course, it's so soft that it's hard to complain! The singles are spun to about 40 WPI, and plied to about 18 WPI. I'm spinning the singles on my Guild's single treadle Schacht Matchless, and plying on my Hansen e-spinner. So far, I've spun almost all the singles, and plied one skein. I might run that one skein back through the wheel to add some ply twist, since it's looking a little underplied to me. Currently, I don't have any specific plans for this yarn. I'm guessing that once everything is plied, I should have about 1,000-1,200 yards of it. And then I'll have to think of something new to spin. ;) What do you do when you feel like you have "nothing" to work on? Let me know! |
Archives
January 2024
Categories
All
|
 RSS Feed