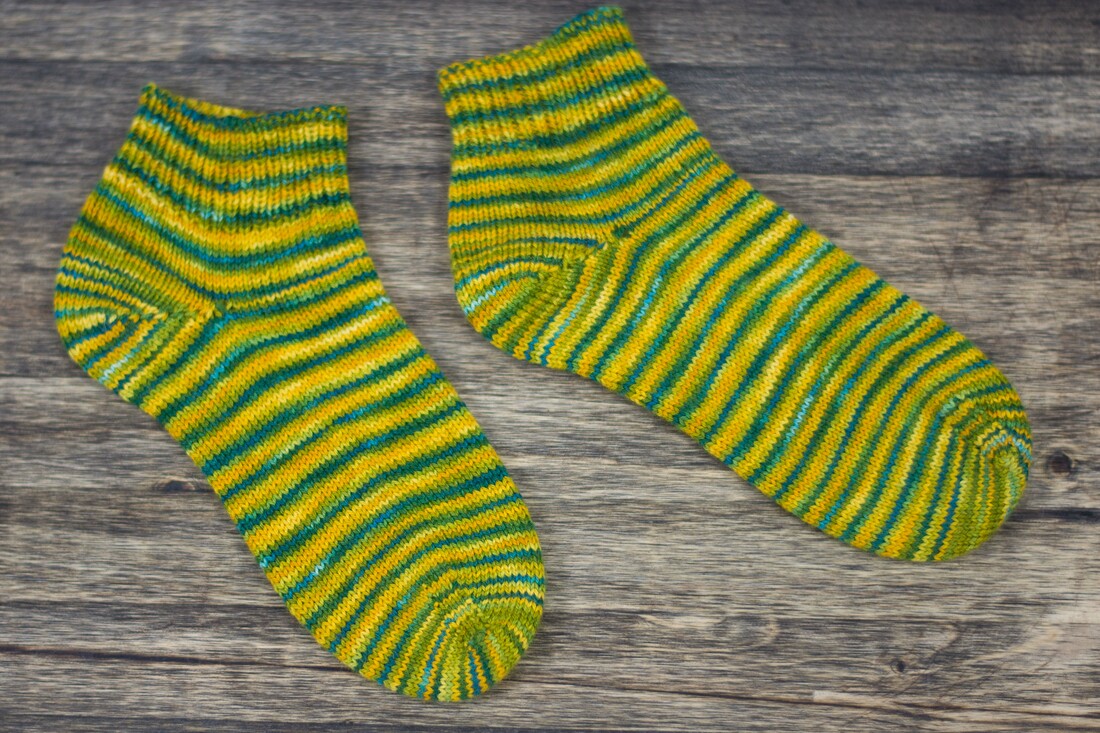
 These socks are finally off the needles, after about six months of working on them! They're basic stockinette socks - the stripes are due to how I dyed the yarn. Worked form the toe-up with a short-row heel, there's nothing really different about these socks than the dozens of other pairs I've made over the years. Except that they took so long to make! Normally, a pair of socks takes me about 16-20 hours of knitting, spread out over a few weeks or a month. I dyed the yarn in April, at a dye workshop with my local guild. I cast on sometime last summer, and was delighted to find I'd inadvertently created a self-striping colorway! One of the reasons these socks took me so long was that when I started working on them, I was also suffering from a lot of fatigue in my hands. So even though I was loving the colors, they didn't get worked on much. I know that I was close to finishing the first sock in September. By the end of December, I was halfway through the cuff of the second sock, and decided the ribbing was the last thing I wanted to work on. Last week, I finally finished the ribbing, and then it sat for yet another week waiting for the bind off (tubular bind-off, my favorite), weaving in ends, and blocking - a silly wait, since all those tasks took me less than twenty minutes. Besides the literal pain in my hands when I first started working on these, I think one of the reasons this pair of socks took so much longer to make was that I didn't really need another pair of socks. Over the last couple of years, I've knit more than 20 pairs of socks. Adding that to a collection of SmartWool socks that I bought almost 10 years ago when I was working at a shoe store, I have a sock drawer that is pretty well-stocked. At this point, having socks on the needles is less about filling the need to put socks on my feet, and more about having a simple, portable knitting project ready to go at all times. Which brings me to the question.... Should You Kon-Marie Your Works in Progress? I read The Life-Changing Magic of Tidying Up way back in 2015 when it was just a book and not a Netflix sensation. Now that Marie Kondo has been invited into the living room of just about anyone with a Netflix account, there are lots more people talking about tidying up. Which isn't a bad thing. One of the things I took away from reading Kondo's book was that I really needed to be more thoughtful about how and why I acquire stuff - including yarn and knitting projects. However. It's easy to take Kondo's "spark joy" approach and twist it into a consumerist excuse for throwing away too much, with no regards for the consequences. When my hands hurt, these socks didn't spark joy. They made me feel a little hopeless, really, that one of my favorite hobbies was bringing me pain. When I had ten rounds of ribbing left to knit, these socks didn't spark joy. They made me downright bored. But when the socks were finally finished, that sparked joy! Here's the thing about creative projects - they're not always joyful all the way throughout the process. There are challenges in every project, no matter how small or simple. Sometimes those challenges are draining, and sometimes they're fun. But they don't always "spark joy" immediately. Sometimes that joy is delayed, like with these socks. As fiber artists, it's really up to us to think deeply about the projects we take on, the ones we hold on to despite the challenges, and the ones we decide to let go. Each of us has different priorities and needs, and we should all take those into account when we are considering our works in progress. Sometimes, like with my socks, a period in "hibernation" is exactly what the project needs. Sometimes the knitter needs some time to think through the challenges, to heal sore hands, or time to work on other more pressing projects. Sometimes, as Felicia Lo of Sweet Georgia Yarns said in this excellent video, casting on for a new project might just be about learning a new technique and not making the thing itself. Or a sweater that you started a year ago might not fit with your wardrobe now. It's perfectly fine to let these projects go. The bright side - it's just yarn, and can be easily unraveled and re-used! How do you decide whether you should tidy up your works in progress? 
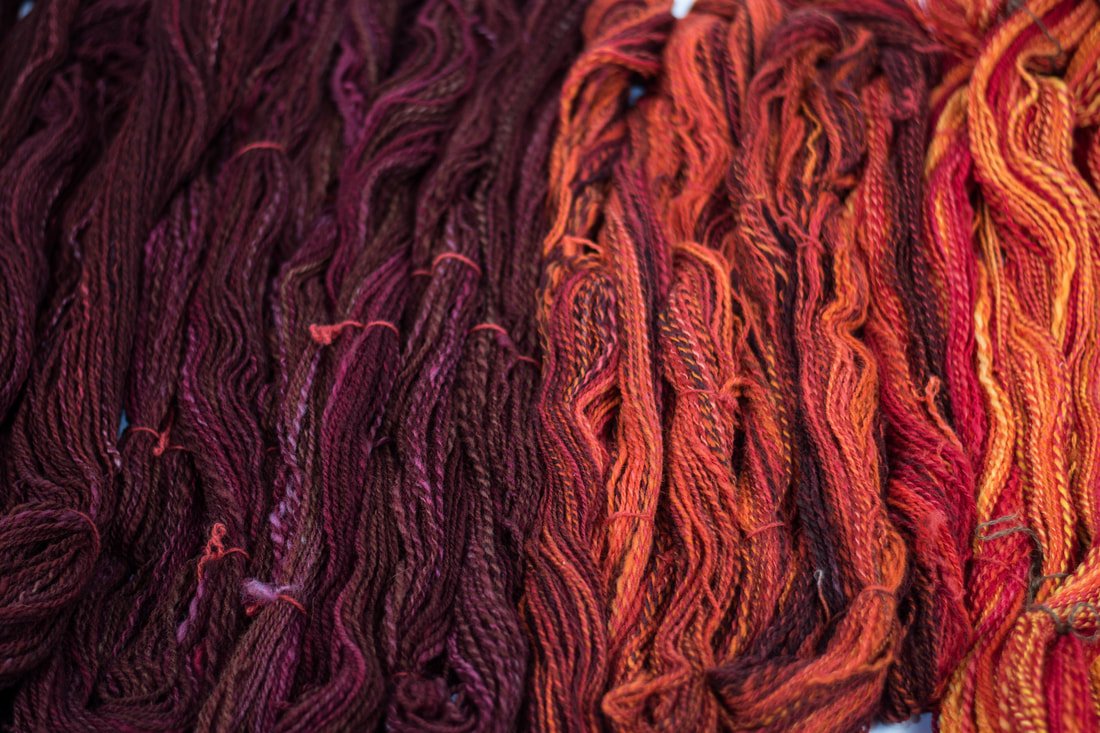 Spinzilla is a yearly competition to see who can spin the most yarn. There are two categories: teams and "Rogue" spinners. There are winners in each category, based on yardage spun. It's all a friendly competition, and registration fees help fund the TNNA foundation, which helps to educate the public about fiber arts. I wasn't so sure I was going to participate in Spinzilla this year. Last year I signed up to participate, and ended up spinning almost nothing. All the emails asking me to submit my yardage were a little depressing, since I was so disappointed with myself. This year, I knew I was feeling overwhelmed with other commitments, and thought it would be silly to add one more thing to my plate. Naturally, I signed up! As I had done in the past, I chose to sign up as a Rogue spinner. I don't usually participate that much on forums, and there wasn't a team close by, so "going rogue" seemed like the best fit. I decided to be gentle with myself this year. Just spin a little bit in the morning and evening, and don't worry about how much yarn there is at the end. I figured that schedule matched my habits anyways. Plus, I thought it would be interesting to see just how much I could spin in a week without really rushing myself. I often spin for projects over very long periods of time, so using this week's spinning as a baseline for future estimates seemed like a good idea. 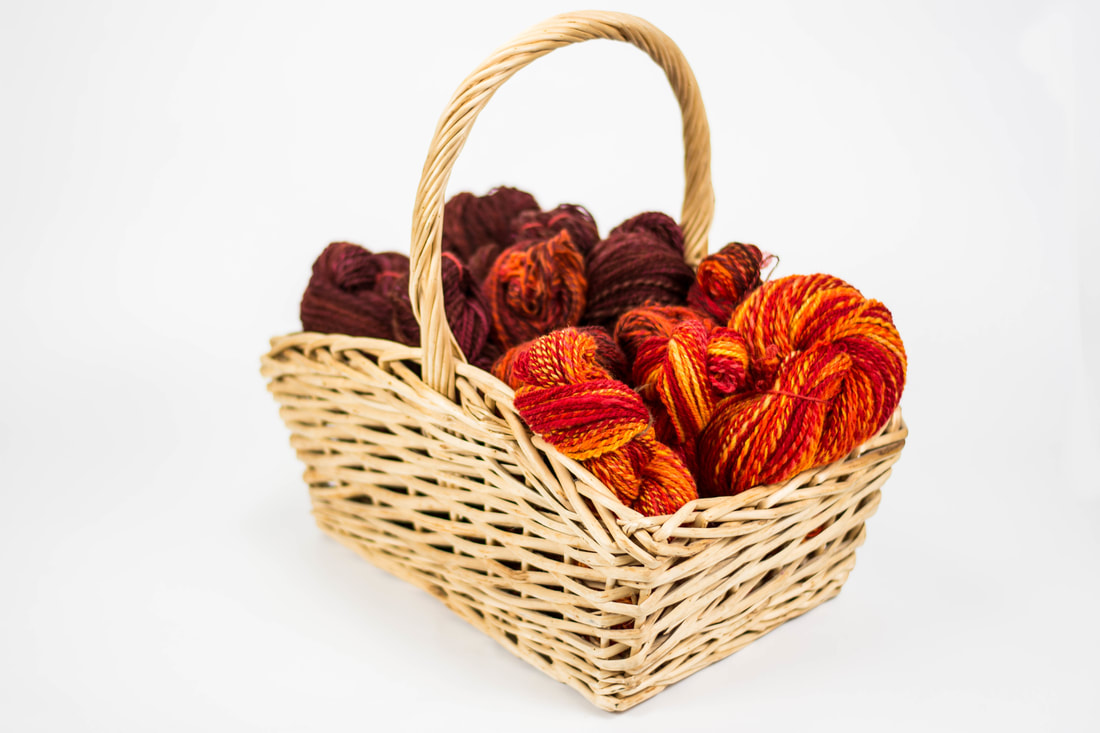 In the end, I spun 1,708 yards of 2-ply yarn.* Since I don't have many bobbins handy at the moment, I plied as I finished spinning the singles for each colorway. The middle red-orange colorway had one single that was significantly longer than the other, so I plied that with the bits left over after plying on the other colorways, resulting in a few mini-skeins that are slightly different from their "main" color. The fiber is Dorset Horn top from the Woolery, chosen because it was their "special" Spinzilla discount fiber this year. I bought 2 pounds (4 eight-ounce packages), and dyed each one a different color. The two darkest colors are very similar, and then there is a red/orange colorway, and a yellow/orange colorway. There wasn't really a method to the madness when I started dyeing the fiber - I just wanted to use up some pre-mixed dyes that were on the old side! I had a lot of red, orange, and yellow, so that's mostly what I used. The darker shades also have some purple and black in there to get the color to a deep burgundy. I used my guild's spinning wheel, a single-treadle Schacht Matchless, to spin and ply all the yarn. This wheel is really one of my favorites to spin on, since it goes so fast. Lately I've been experimenting with double drive as a tensioning system, and really enjoy that setup. I'm still undecided as to how I'll use this yarn. It's definitely not a soft-next-to-skin sweater yarn, at least for me. In researching the wool, I thought it would be a good rug yarn, and planned to use it in a warp. It might be a little bit sticky for what I had originally envisioned. I've also toyed with the idea of rug punching with it. Once I took the pressure off myself to break records, spinning for Spinzilla this year was really a lot of fun! *Because of the way Spinzilla gives credit for yardage, this is actually 5,124 yards (1,708 yards of single ply, multiplied by two, plus another 1,708 yards of spinning for when they are plied together). That's just under 3 miles of yarn!
 The last time I blogged about this, it was still yarn. Now it's cloth, and I couldn't be happier with the outcome. Unlike some of my other projects, warping this piece was relatively easy - after two days of warping, and a little bit of sampling, it was ready to weave. As I often do, I threaded the loom for a twill pattern, just to keep my eyes from glazing over while I was threading the heddles. A plain weave structure is typically warped on shafts 1-2-3-4, and then that sequence is repeated until the end of time. For twills, there are endless variations of patterns, but the one I chose was 1-2-3-4-3-2-1-4-3-2-1-2-3-4. The upshot is that there are more pattern possibilities with that complexity, including plain weave. I sampled several twill treadlings, but didn't like them on the cloth. I often find that with a gradient warp like this one (and also this), plain weave just shows off the gradient in a wonderful way. Originally, I had wanted to use a handspun weft in a dark brown. But I wanted to get the fabric woven more than I wanted to wait while I spun more yarn. Instead, I ended up using an olive green wool/alpaca blend that I bought as mill ends. It's 24/2 (laceweight for you knitters), and I bought a 4 pound cone of it that seems like it will never end. Even with about 5 yards of weaving on the loom, I barely made a dent in it. 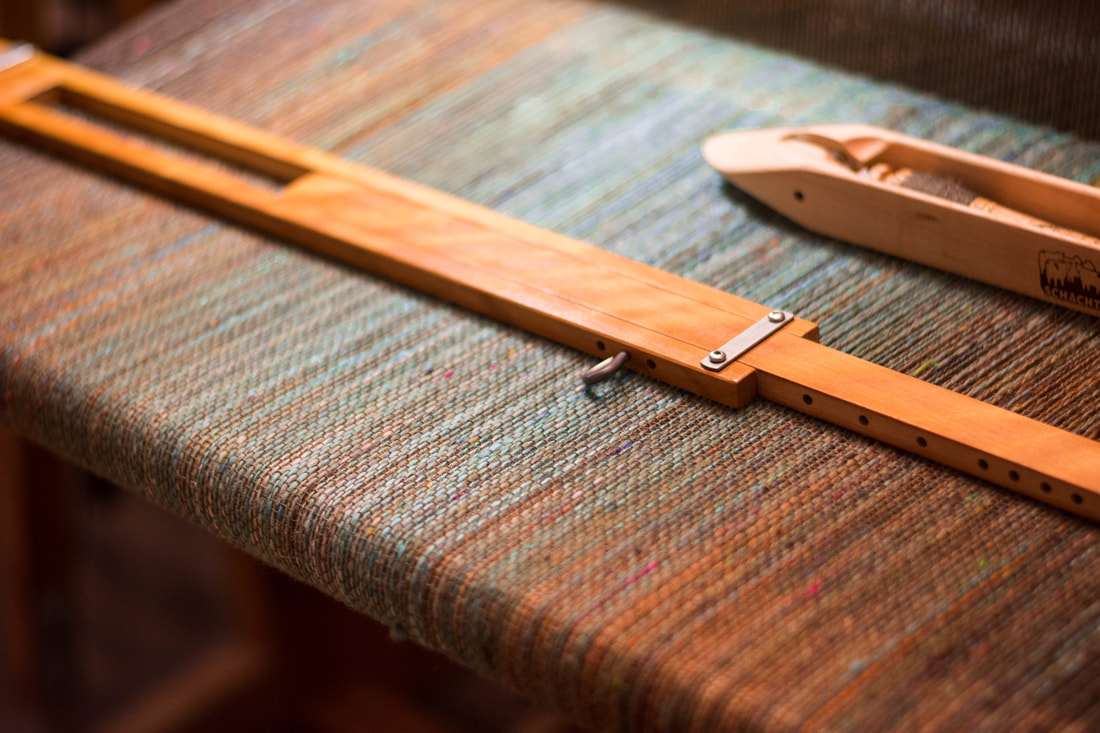 I originally set the warp at 12 ends per inch, but it seemed too sticky. I re-sleyed the warp at 10 ends per inch in my 8 dent reed (the 10 dent is rusty), double-sleying every fourth slot. It turned out that the yarn was probably a bit too thick for a 12 dent reed, and I probably could have gotten away with 12 ends per inch if I'd started off in the bigger reed. After re-sleying the warp into a different reed, though, I was not in the mood to re-sley yet again. Once I got weaving, there was no stopping me. It took a few days, weaving in one or two hour chunks, and then the warp was ready to take off the loom. I wet-finished it in the washing machine. I was a little hesitant to do so, since even though I have a top-loading washer, it locks as soon as the cycle begins and it's just about impossible to pause the cycle to check on the progress. I set the washer to cool water on the gentle cycle, and selected the "deep water wash" option so there would be plenty of room in the water for the fabric to move around. It still needed a little more fulling once it came out, so I tossed it in the dryer for about 20 minutes, checking on it every five minutes or so. The results look like this:  Because the weft is so much thinner than the warp, but I wove it as a "balanced" weave (10 ends per inch in both the warp and weft), the fabric is fairly thin and lightweight with a really nice drape. I'd been intending to make a loose fitting jacket from this, and started to gather fabric for a muslin when I realized how much of a yardage eater it is. My mom suggested the Fit for Art Tabula Rasa Jacket instead. I'm currently waiting on the pattern (and most of the extensions) to arrive in the mail. Then I'll make a muslin and hopefully be ready to dive in to actually do something with this fabric! 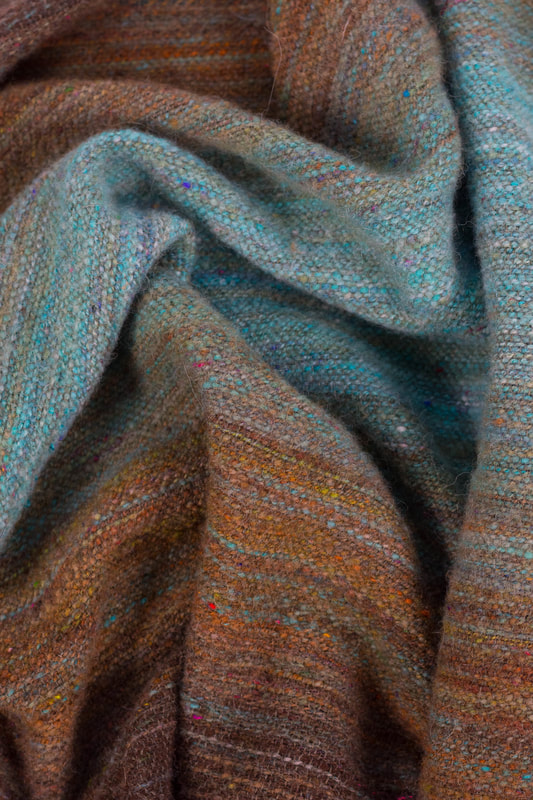 ~Pamela
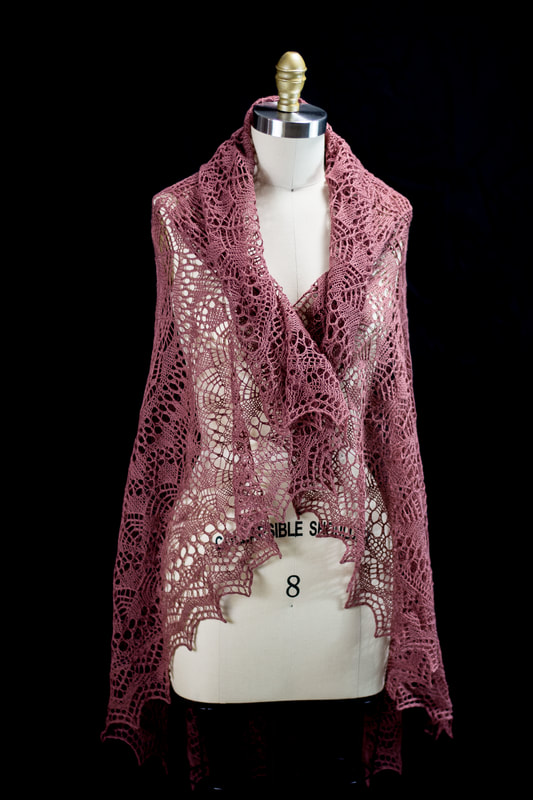
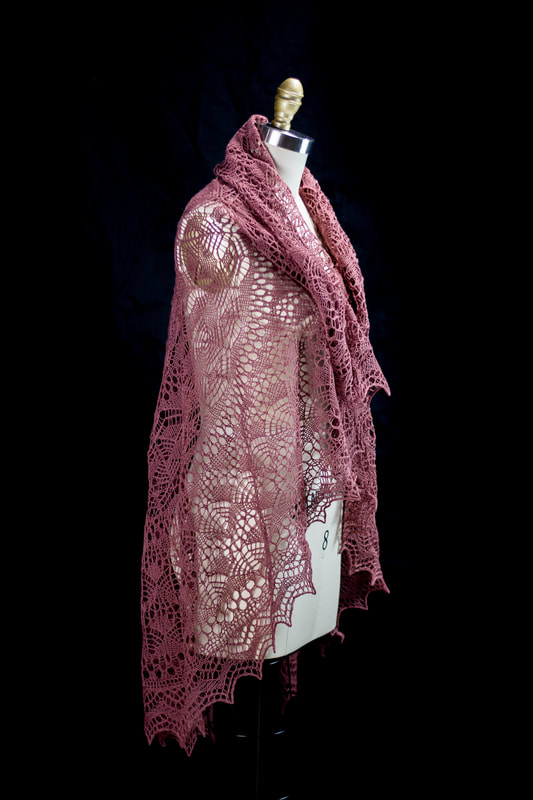
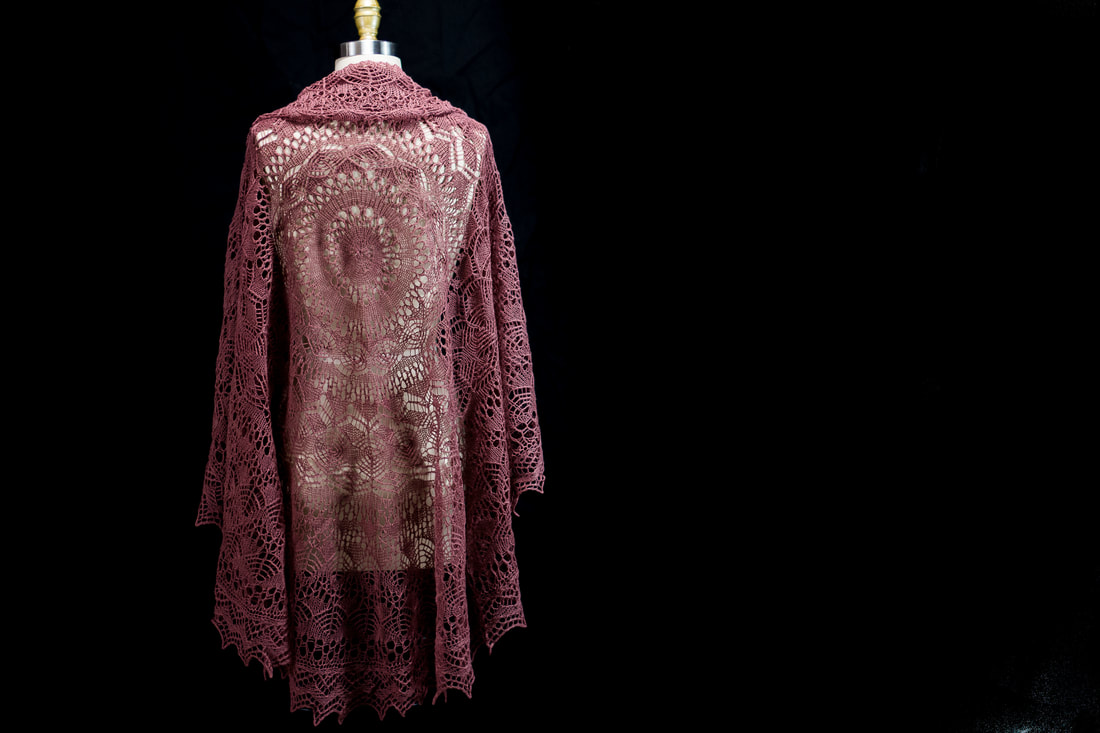 I don't need another lace shawl...but this just *fell* off the needles. It's the Lucca Shawl, designed by Jared Flood, in Brooklyn Tweed's Vale. The color is "Barberry." I bought 4 skeins, intending to make a lightweight wool tank out of it, but after swatching, I realized I wouldn't have enough yarn. Then some unexpected travel came up, and I didn't have any travel knitting. A quick browse through Ravelry told me that I could knit the large version of this shawl with the number of skeins I had, so out came the needles. I was able to get the fiddly bit of the cast on done before hitting the road, and this shawl kept me company through the whole week that I was traveling.
I wanted to get it finished before I went to YarnFest in April, but only managed to get the body of the shawl finished before leaving - there was still the border left to do. That bit dragged on for several weeks - at one point it felt like I must be almost finished, but every time I counted I was only 2/3 of the way through. As these things go. 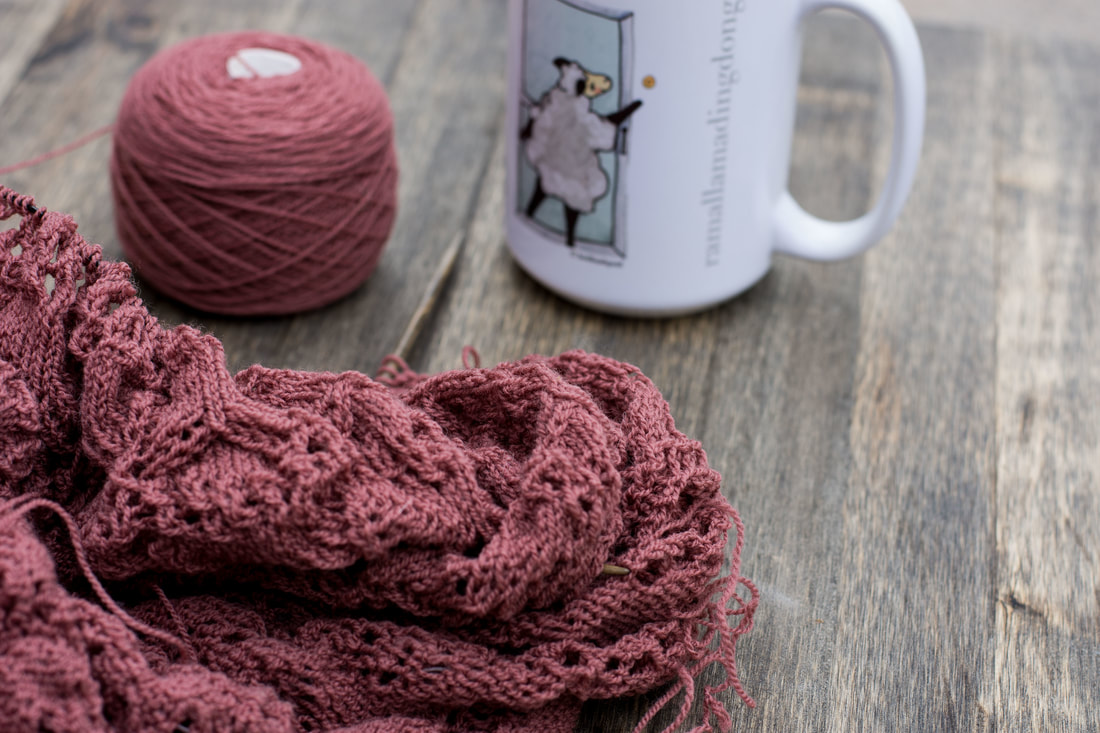 The interesting thing about this pattern is that there is a small size and a large size - and the only difference is the gauge. The small size is knitted on 3 mm (US size 2.5) needles, and the large is knitted on 4.5 mm (US size 7) needles. Looking at the yarn, I felt like the 4.5 mm needles would be ridiculous, and scaled back to a size 4 mm (US size 6). This ended up using just shy of 3 skeins of yarn, and makes me sneakily suspicious that the "large" size was engineered to sell an additional skein of yarn. Regardless, I enjoyed working with the yarn immensely, as I always do with Brooklyn Tweed. I took the extra skein and overdyed it - but that's a different post entirely. Ravelry project page here. xx,
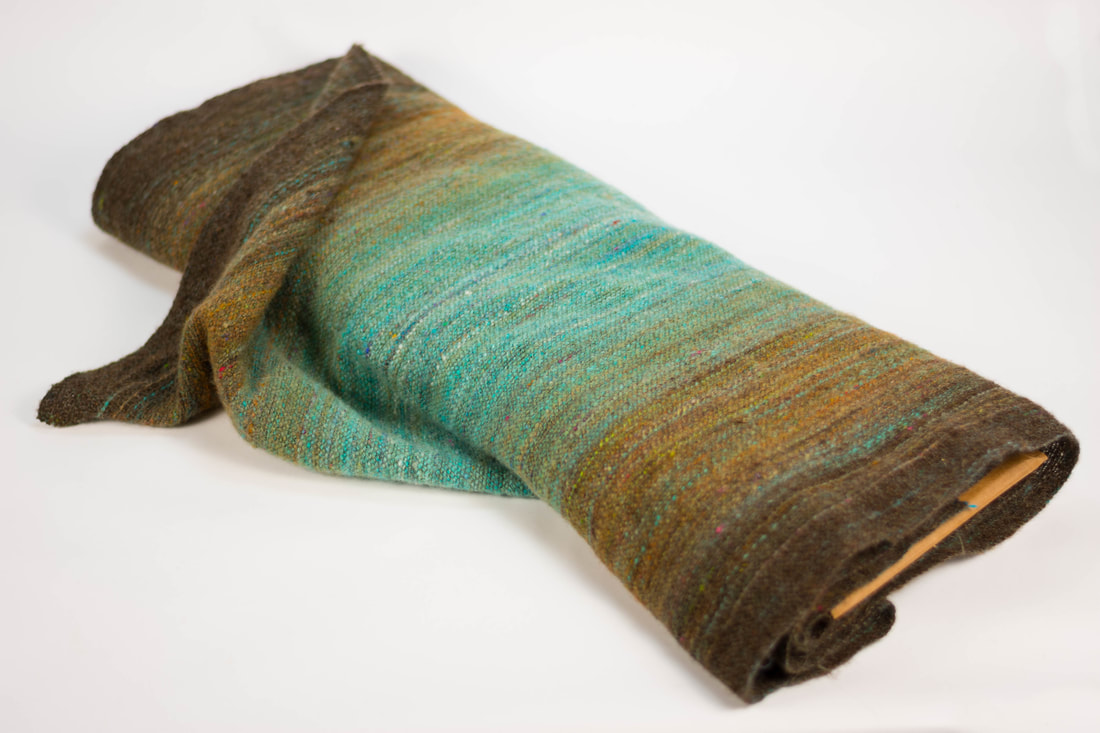
Pamela 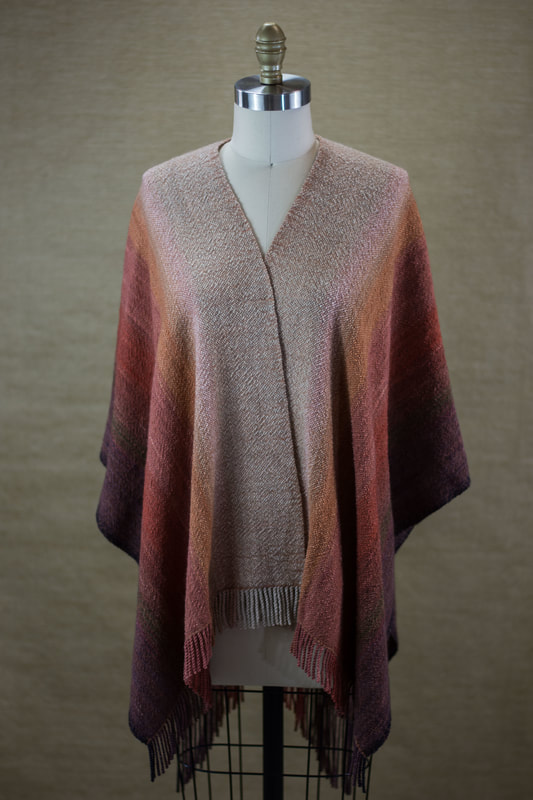 I want to say that it's amazing when a project goes from idea to finished object with little to no effort. I mean, I guess it is amazing, and I'd love for it to happen all the time, but part of the process is all that effort. And we have to be open to changes to our ideas. This ruana started with a photograph last fall: 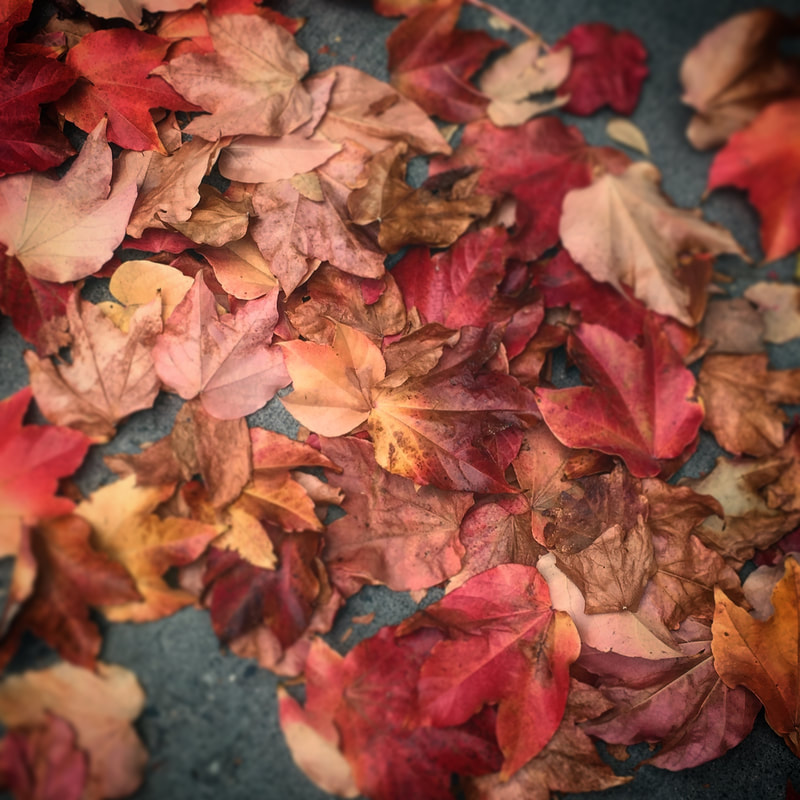 I'd been walking along, loving the fall colors, and looked down to see all these leaves at my feet. Originally, I'd thought these colors and shapes would make an excellent colorwork sweater. Then I started my stash sweater, with a very different concept, and this photograph has been sitting on my phone ever since. Sometime in mid-January, I had a lightbulb moment and realized I could dye all the colors I needed. You know, cause I sell my own hand-dyed yarn and all that. In retrospect, it seems obvious, but it was a lightbulb moment at the time. Anyways, I was a bit daunted by the sheer number of colors in this photograph - they're more or less analagous, but there are so many different shades. Which ones to choose? I launched a couple of different free online color palette generators, and picked my favorite set of colors. I like the generators that give you a bunch of colors, not just three to five. With a swatch printout of 15 colors, I circled my favorite 6. At this point, I was still thinking I was making a sweater, and I tried to get a range of values so there would be enough light/dark contrast to make the colorwork visible. I started guessing at dye recipes, aiming for a gold, a brown, and a red. For each recipe I used, I dyed at DOS (Depth of Shade) 2, 1, and .1. Then I evaluated the colors I wound up with - some were surprising to me in a wonderful way, and others made me wonder "what was I thinking?"* 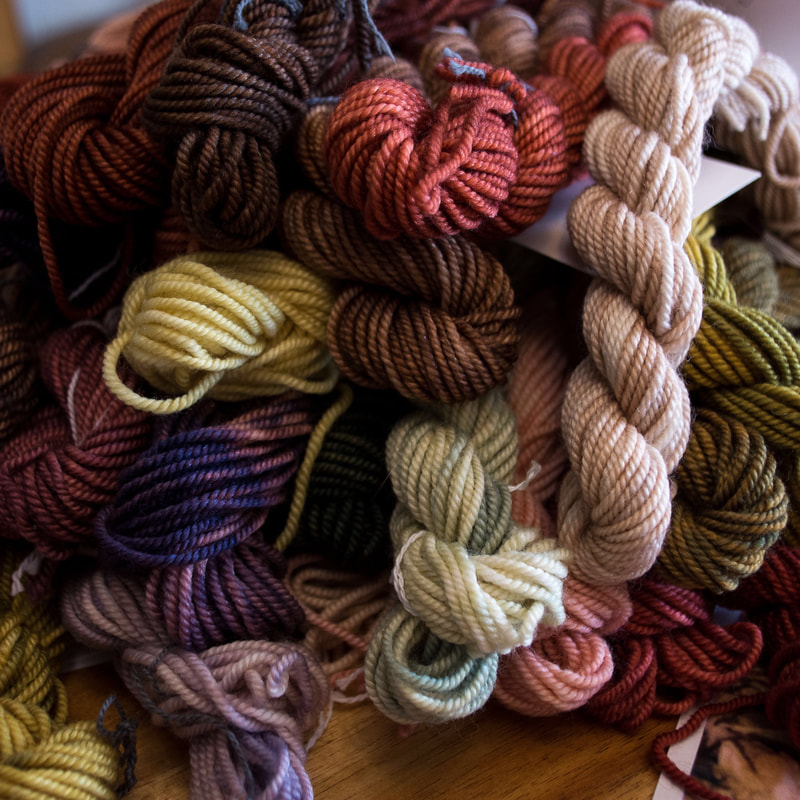 All of my samples were 10 grams - enough to get a good picture of the color, and a usable amount of yarn, but not a waste if I hated it. All were dyed with combinations of Greener Shades Blue, Flame Red, and Yellow. Each color has at least a little bit of each. My decision to do this was based on a natural dyer who told me that no plant dyes are one pure color - they all contain a little bit of all colors, which is why most natural dyes are harmonious with each other. Since my original inspiration was plants, I figured I might as well see what happened. Many dyers are obsessed with pure, bright colors these days, but I was trying to get a deep and nuanced color. As you can see above, my first round of dyeing didn't yield all reds, golds, and browns. Looking back at the dye recipes I used, it now seems obvious that green or purple would have been the result, but I had plenty of surprises coming out of the dyepot. 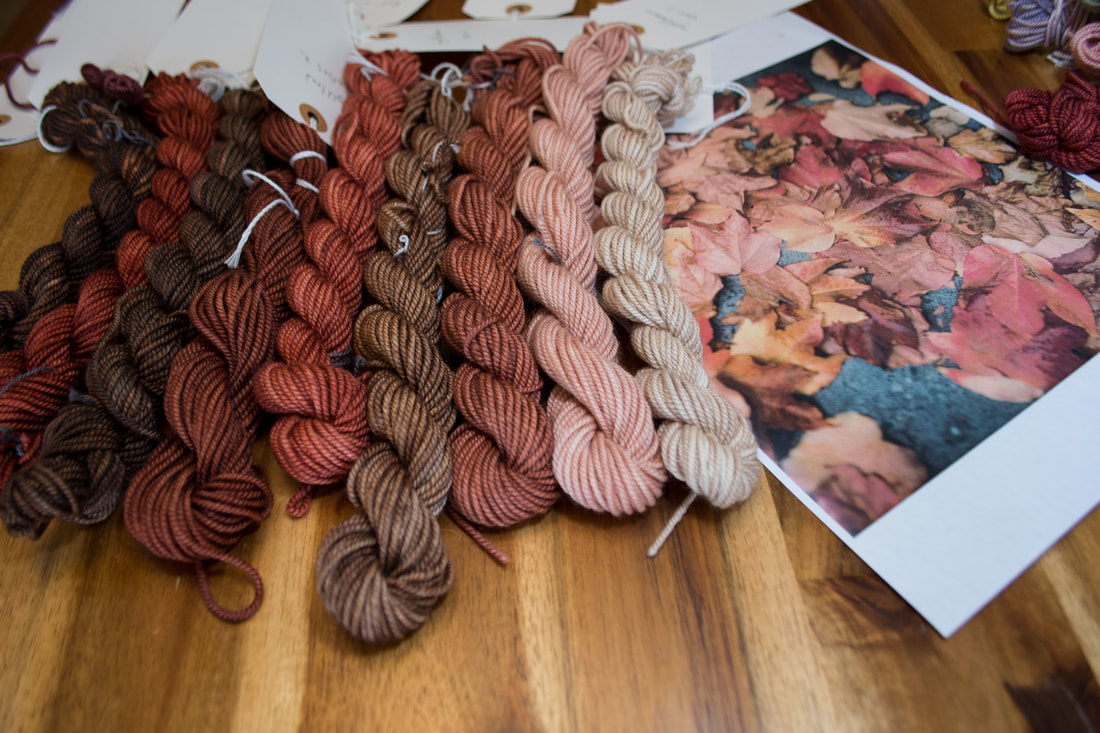 I pulled together the colors that were what I was aiming for, with a printout of the original photograph for reference, and decided that a gradient was the way to go. It was somewhere around here that I got the idea to weave a ruana, with the lightest colors at the center, and the darkest colors at the outside. With the shift from colorwork sweater to gradient weave, though, I felt there were some gaps in my color gradient, and set about to dye some more colors. In the end, I used 14 different colors for the warp. 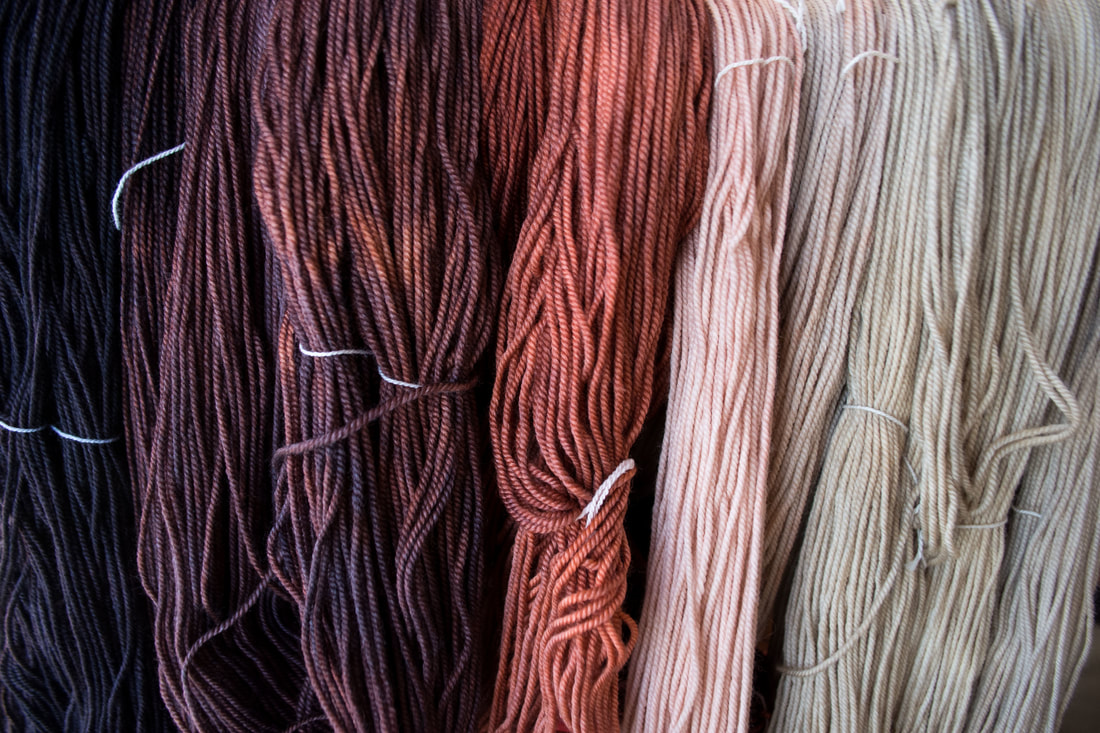 I also decided that there would be main colors and intermediate colors - not every stripe is the same width, and even among the dominant/supporting stripes, very few of them are the same width. I felt like this would bring an organic quality to the progression. I made a loose plan for how many warp ends each color would be, mostly so I wouldn't waste yarn during the dyeing process. Then I set about to warping my loom, and only loosely followed my warping plan. My original warp was 23.5" wide in my 24" wide table loom. I dyed my weft yarn (which is slightly thinner than the warp). The warp was sett at 12 ends per inch, and I wove the weft at 12 ends per inch as well. I wove off a sample piece of fabric and wet finished it to make sure everything was perfect. It wasn't. 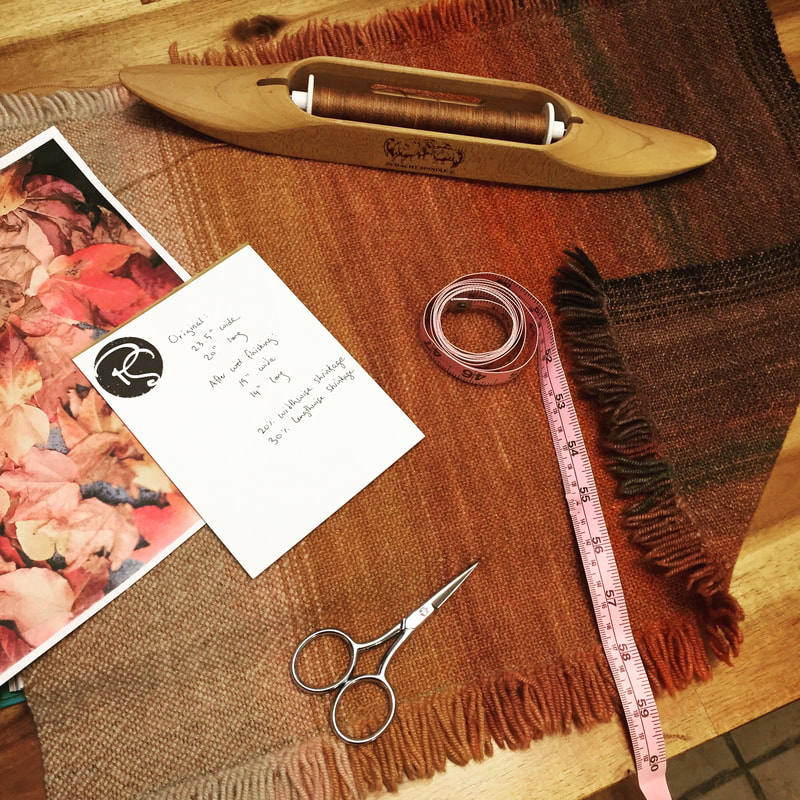 I mean, I loved the fabric. It did almost exactly what I thought it was going to do. But the colors...Can you see where the yellow/orange meets the beige? There's a pretty distinct stripe there. And at the far right, where the dark brown meets what looks like black. Everywhere else, the gradient fades in and out of itself. On the loom, it was harder to see. Off the loom, I felt like it stuck out like a sore thumb. I sat with this piece for a couple of weeks, knowing that I'd need to dye a few more colors to even out those spots. Plus, I was a little bit worried that the weft was too orange/yellow for my face. I asked at a guild meeting and got split responses, so I decided to ask my mother, who was conveniently in town. You know, for such a major design choice! Anyways, I dyed the in-between colors, and inserted them into the warp, which involved a little bit of surgery - my final warp ended up using the whole 24" reed, instead of just 23.5", and I had to move a bunch of the taupe warp ends over. But, it was definitely worth it to get an even color gradation. 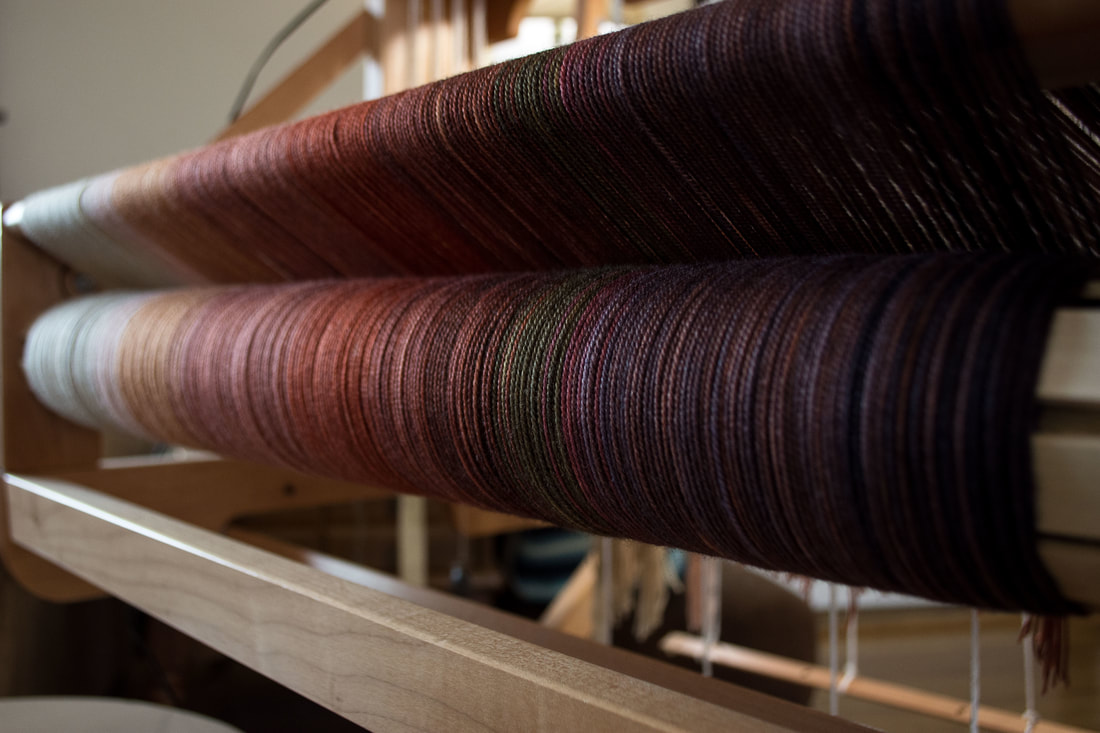 Then it was time to weave. Based on how long my original warp was (6 yards), the length of my sample, the shrinkage in wet finishing on my sample, and my estimate for waste, I was operating on a pretty tight margin. I played with the calculator (again and again and again) and decided that I would weave 70 inches, leave 10 inches unwoven for fringe, and then weave another 70 inches. Honestly, it was a bit of a nailbiter...As I finished weaving the first half, I thought I'd have plenty of yarn...and as I came to the end I worried I wouldn't have enough. As luck would have it, I had just enough. The last few inches were tricky, and I did end up switching to a damask shuttle to make my life easier, but there was enough left over that weaving the last few inches wasn't terrible, and not so much that I felt like I should have woven the piece longer. After hemstitching and cutting down from the loom, it was time to fix mistakes. There weren't that many, but there were a few, and I've learned that it's better to look for them early on in the game rather than after everything is wet-finished and the mistakes are harder to fix. 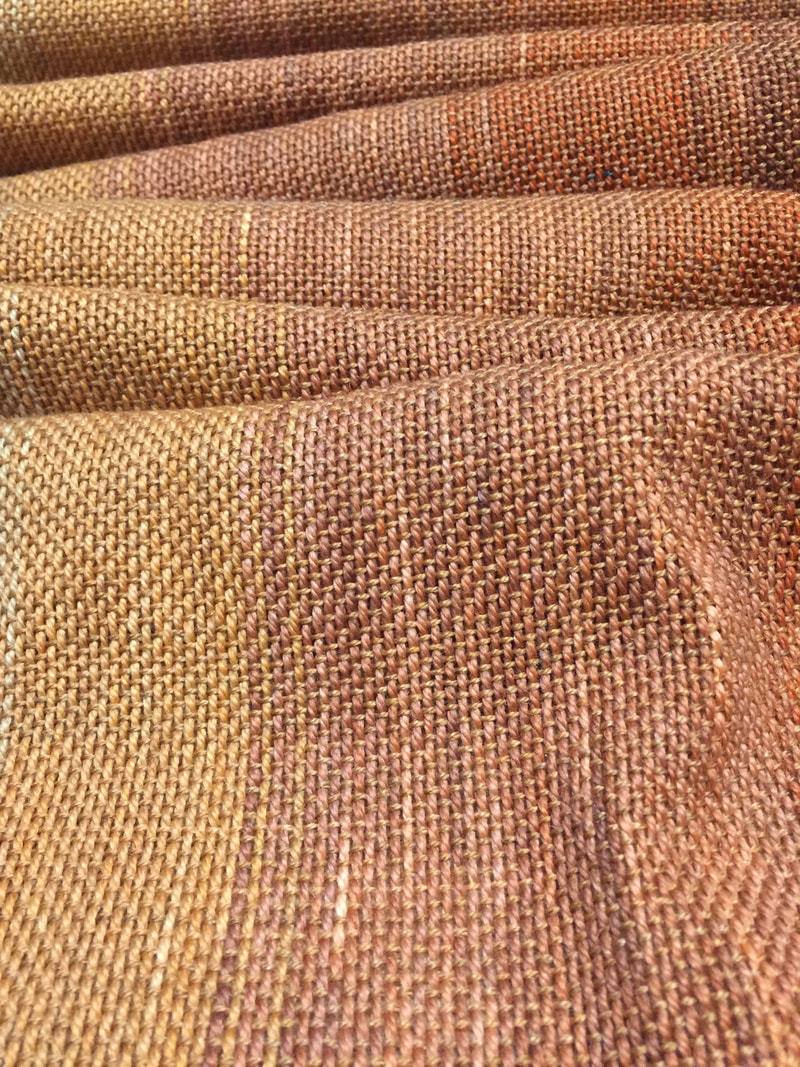 And after fixing the mistakes, it was time to seam down the back and twist fringe. I decided to make the fringe in the back longer than the fringe in the front. The fringe in the back was basically the waste yarn from tying on to the front and back apron rods, and the fringe in the front was the unwoven gap between each piece. Anyways, to decide where the seam should end, I folded the pieces in half, with the edges of the fringe matching up to each other, instead of the edges of the cloth. Then, I started the seam about an inch below where it would end, seamed up to the end, and then worked my way back down. That way, the part at the neck opening had a reinforcement that will hopefully protect it from wear and tear. Twisting fringe was an epic odyssey that felt like it was going to last forever. (In reality, about 5-6 hours.) But once that was done, it was time for wet finishing. I put the ruana in a tub of warm water with a color catcher while I went off to my Tai Chi class. When I came back home, I toyed with the idea of wet-finishing entirely by hand, but the weight of the thing was intimidating to me. I swished it through some hot water again with some woolwash, then threw it in the dryer for about 20 minutes with a dry towel. After 20 minutes, it needed about 5 more minutes until it was the size and texture I was expecting. Once I took it out of the dryer, I gave it a bit of a press with my iron, set to wool/silk with no steam, to get some of the extra moisture out. I let it sit overnight to dry fully, and then trimmed the edges of the fringe. 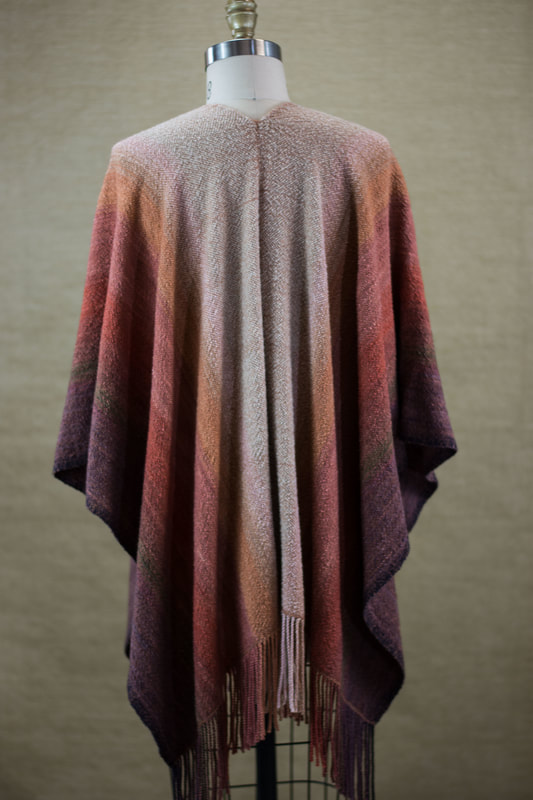 I'm super pleased with the result...and I think there might be a few more ruanas in my future. It would be easy to say that this piece practically made itself, but that wouldn't be true. There were lots of design choices and little hiccups along the way. What matters is that the whole process was enjoyable and that I have a finished product that I know I'll enjoy. Happy making. xx, Pamela *I've since found a much better way to figure out a starting point for dye recipes. Alanna Wilcox describes it all here.
|
Archives
January 2024
Categories
All
|
 RSS Feed